
Introduction to Starch Hydrolysis Test
The starch hydrolysis test is a differential microbiological technique used to detect an organism’s ability to hydrolyze starch using the extracellular enzyme α-amylase. Starch, a complex carbohydrate and a major energy source, is primarily composed of two glucose polymers: amylose (a straight-chain polymer) and amylopectin (a branched-chain polymer).
- Amylose consists of thousands of α-D-glucose units linked by α-1,4-glycosidic bonds.
- Amylopectin includes both α-1,4 and α-1,6 glycosidic bonds, giving it a branched structure.
Amylose and Amylopectin Structures
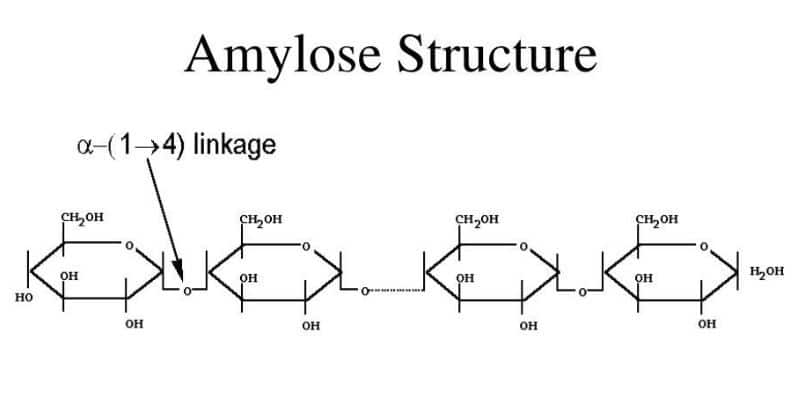
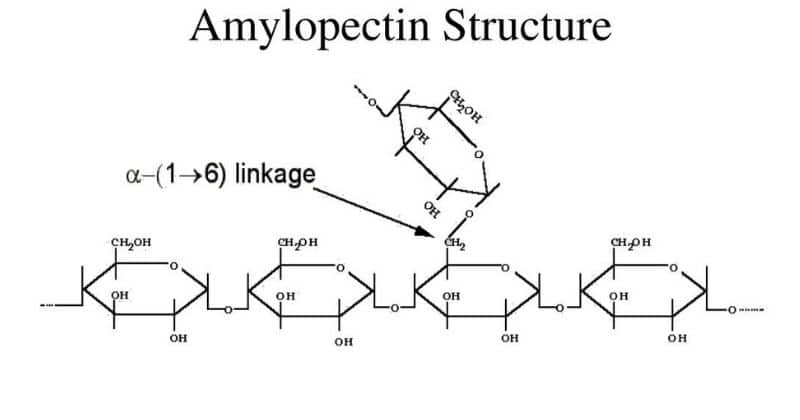
Image Source: slideserve
Principle of Starch Hydrolysis Test
Since starch molecules are too large to enter bacterial cells, only microorganisms that secrete exoenzymes like α-amylase and oligo-1,6-glucosidase can break down starch into smaller units like maltose, glucose, or dextrins. These simpler sugars can be transported into the cell and used for metabolic activities. Role of Iodine: After incubation, iodine solution is added to the starch agar plate. Iodine reacts with unhydrolyzed starch to form a blue-black complex. A clear halo around bacterial colonies indicates starch breakdown, signaling positive starch hydrolysis.
Objectives of the Starch Hydrolysis (Amylase) Test
- To determine an organism’s ability to hydrolyze starch.
- To differentiate amylase-positive from amylase-negative bacterial species.
- To aid in the identification of bacterial genera based on α-amylase activity.
Starch Agar Medium Composition
| Ingredient | Amount (g/L) |
| Peptic digest of animal tissue | 5.0 g |
| Sodium chloride | 5.0 g |
| Yeast extract | 1.5 g |
| Beef extract | 1.5 g |
| Soluble starch | 2.0 g |
| Agar | 15.0 g |
| Final pH: 7.4 ± 0.2 at 25°C | |
Procedure of Starch Hydrolysis Test
- Use pure cultures of the test bacterial isolate.
- Prepare nutrient agar and pour a thin base layer into sterile Petri dishes.
- Prepare starch agar medium by adding 1% soluble starch to nutrient agar and sterilize by autoclaving.
- Pour a thin upper layer of starch agar over the nutrient agar base to create a dual-layer system.
- Allow the medium to solidify and cool.
- Inoculate the test organism by streaking or spot inoculation in the center of the plate.
- Incubate the plates at 37°C for 18–24 hours.
- After incubation, flood the plate with iodine solution and observe the results.
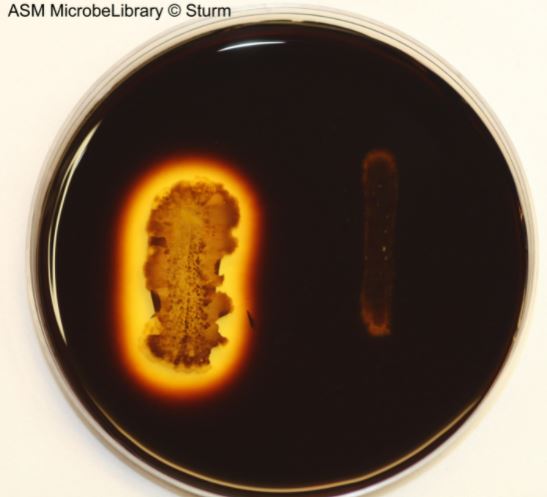
Result Interpretation
- Positive Test: A clear, colorless halo around bacterial growth indicating starch breakdown.
- Negative Test: No clearing, and the entire medium turns blue-black due to unhydrolyzed starch.
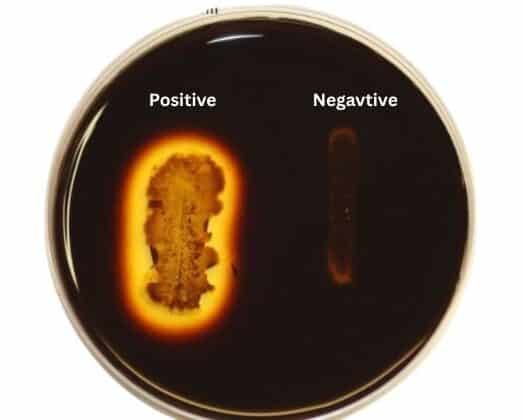
Image Source: ASM MicrobeLibrary
Uses of Starch Hydrolysis Test in Microbiology
- Differentiates amylase-producing species from non-producers.
- Useful in identifying species from the following genera:
- Bacillus
- Clostridium
- Corynebacterium
- Fusobacterium
- Enterococcus
- Pseudomonas
- Streptococcus
- To distinguish Streptococcus bovis (positive) from other viridans group streptococci those are bile esculin positive, 6.5% NaCl negative and pyrrolidonylβnaphthylamide (PYR) negative.
Limitations of Starch Hydrolysis Test
- Avoid using glucose-containing media, as glucose metabolism can interfere with the results.
- Iodine kills the organisms, making the plate unusable for further culturing.
- Partial hydrolysis may result in a reddish-violet zone, requiring re-incubation for conclusive results.
Also Read:
